
These are green beans.
If you’ve only ever bought them in a can or frozen, but never taken the plunge and bought them fresh, here’s your sign to remedy that.
Here’s way too much information on green beans and what to do with them.
- What are beans?
- Buying and storing green beans
- General nutrition
- How to cook green beans
- Simple – roast or pan sear
- Moderate – blanched
- Advanced – preserving
- Closing remarks
What are beans?
Before we deep dive into green beans, let’s look at beans as a whole.
Beans are a commonly cultivated variety of vegetable in the legume family – and I mean, very common. Beans have been cultivated for human consumption since the 7th century BCE – that predates the beginnings of ceramics! And beans (in some form) can be found growing natively on almost every continent (looking at you Antarctica). That means beans, in some shape or form, are fundamental to every cuisine in the world.
Beans are made of two primary parts: the external pod and the internal seeds. In a delightfully-confusing way (very common in the English language) both the entire vegetable AND the internal seeds can be called “beans”.
What types of beans are there?
There are roughly 400 types of beans, but these can be divided into two broad categories: green beans and dried beans.
Dried beans are beans that are meant to be grown until the pod is leathery and tough, and the seeds are totally developed. These seeds (the “beans” themselves) are then removed from the pod, then either cooked immediately or dried to be cooked later. Dried beans are incredibly shelf-stable and considered one of the most commonly eaten foods in the world.
We’ll do a deep dive on dried beans some other time. Today, we’re gonna focus on green beans.
Green beans are beans that have been cultivated and bred to be picked early, while the seeds are still underdeveloped and the pod is tender enough to eat. Basically, green beans are immature beans. That’s where the name comes from – in gardening, you refer to any plant picked early and tender as “green” (for example, think of “green” onions.)
Note that you can let green beans grow until the pod is tough and the seeds are totally developed. At that stage, they’re no longer great to eat –but the seeds are ready to be dried and replanted the next year to grow more plants, in case you have green bean-farming aspirations.
The anatomy of a green bean

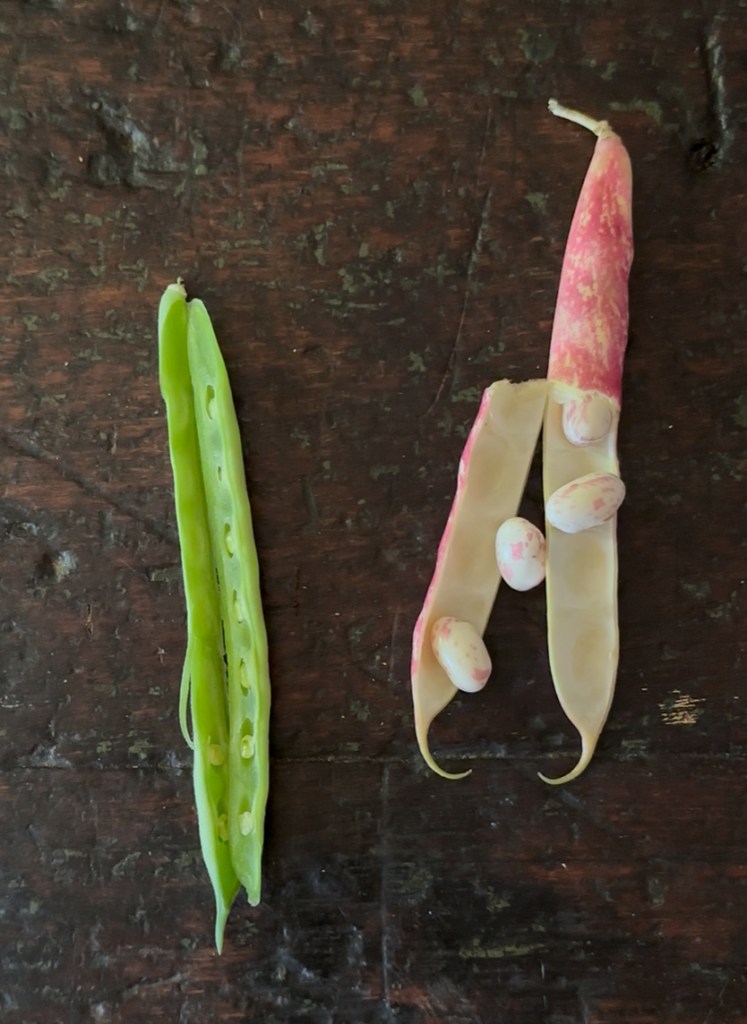
A green bean is composed of two main parts – the external pod and the internal beans.
The green bean has two ends – the “tail” (the end of the seed pod) and the “string” (where it attaches to the plant).
“String beans”
Speaking of “string” – some people refer to green beans as “string beans”. Why is that?
Historically, green beans had a long fibrous “string” that went from the string end all the way down to the tail (running along the seam you can see above). Part of prepping fresh green beans to eat was snapping the string and pulling it out of the bean. That’s where the name “string bean” came from.
However, this obviously made it harder to process green beans. Agricultural scientists have, over the years, bred this trait out of green beans. Today pretty much all green beans that are grown do not have a string.
Buying and storing green beans
Now that we’ve gone over the types of beans, how green beans vary from their dried cousins, and the overall structure of a green bean, let’s talk about the kinds of green beans you can buy at the store or farmer’s market, and go over their most common uses.
Types of green beans
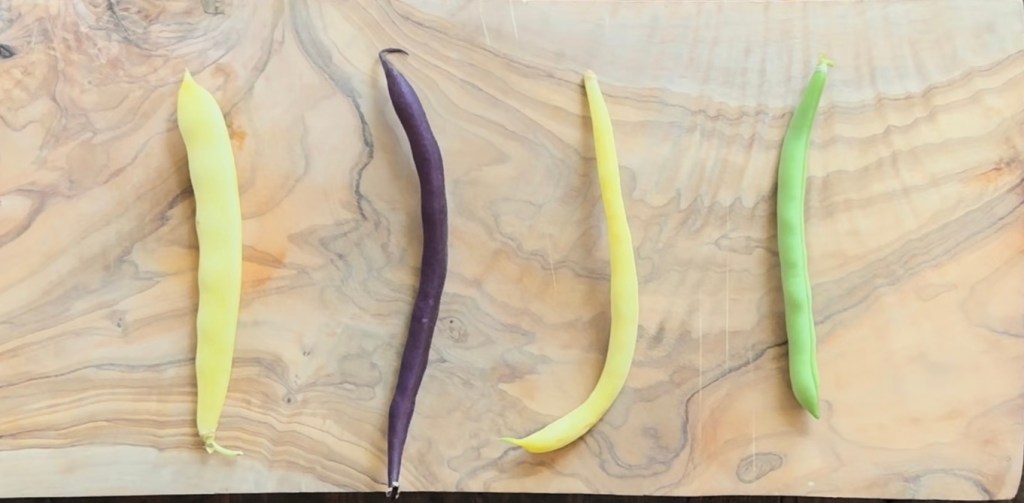
- Green Beans
- These are the classic and most widely found.
- Haricots Verts (“French Green Beans”)
- Longer and skinnier than conventional green beans. These are considered a culinary delicacy and often are a bit pricier than other varieties.
- Wax Beans
- Yellow and roughly the same size as green beans. Despite the color difference, they are interchangeable with conventional green beans. I often will cook both types together to add some extra color to my plate.
- Purple Beans
- These are the same size as green and wax beans, but have a deep, purple color. Unfortunately, this color will mostly go away as the bean is cooked. If you want to keep the color (at least somewhat), cook these delicately (steam or boil) and immediately put them into an ice bath.
- Yard-long Beans (“Snake Bean” or “Asparagus Bean”)
- This is a diverse variety unto itself. It’s technically a different genus than our other varietals; they’re more closely-related to cowpeas than other green beans. BUT… since they cook up almost identically to green beans, we’ll discuss them here.
- These beans can reach up to 3 feet long, but most prefer to pick them at 10-12 inches and pencil-diameter.
- Yard-long beans come in many colors, but mostly light green. The deep-red color of these beans are popular, but lose coloration during cooking just like purple beans.
- This is a diverse variety unto itself. It’s technically a different genus than our other varietals; they’re more closely-related to cowpeas than other green beans. BUT… since they cook up almost identically to green beans, we’ll discuss them here.
- Romano Beans (“Flat Beans”)
- Visually distinct with their wide, flat shape, they may seem the most different of the lot. But romano beans taste almost identical to conventional green beans.
- They can be found in many different colors, most notably green, yellow and purple.
- They are more “snappy” and take longer to cook due to their shape.
Buying a green bean
If you’re at a store with multiple types, which should you buy? Well, it depends on a few things…
- Which look like they’re the best QUALITY?
- What method are you planning to use to cook them?
We’ll discuss both of these trains of thought.
How to choose the best QUALITY green bean
When you’re confronted with a giant tub of green beans at the store or market, how do you pick the best ones? Here are some general guidelines I follow…
Smaller > Larger
Remember: green beans are immature beans that have been picked while tender. Large beans may look cool, but often the size just means they are older, which means the pod and seeds will be tougher to eat. So, if you want the drama of foot-long green beans, just know they’ll take longer to cook till tender.
Firm pod > Wrinkly pod
In general, a wrinkly pod means a green bean is getting old. When a green bean is attached to a plant, it receives water and nutrients from the stem. The water flow will fill the cells and make them rigid. As the beans spend more time off the stem, the cell walls that provide the “crisp” texture of a green bean disintegrate, which results in a wrinkly texture.
Basically, wrinkly beans = old beans. And while wrinkly green beans are fine to cook, they may go bad soon. So don’t grab them at the store if you can help it –try to always buy the most freshly-picked beans possible for extended shelf life.
The best beans for each cooking method
Here’s a table to summarize which beans I would use for each cooking method.
| Green Beans | Haricots Vert | Wax Beans | Purple Beans | Yard-long Beans | Flat Beans | |
| Lightly Steamed/ Blanched | maintains the tender crunch while removing “grassy” taste | the only way to maintain the pretty color | ||||
| Fully Steamed / Boiled | especially good for older, tougher beans | especially good for older, tougher beans | X | X | ||
| Pan/Wok Seared | a good, standard option | a good, standard option | X | considered the best way to cook these | ||
| Grilled / Roasted | a good, standard option | a good, standard option | X | their large size makes them easier to balance on the grill | ||
| Stewed / Braised | X | shape helps it hold up well in a long “low and slow” cook | ||||
| Pickled/ Fermented | the classic choice – the bright green color holds up well. |
Note that you CAN cook any of these beans using any of these methods. I am just noting which method (in my opinion) is the best for each type of bean.
The only BIG caveats I can think of are…
- Purple beans will taste fine when cooked a long time, but almost certainly lose their color and just look… green. If you’re paying extra for the purple, simply blanch them to retain the color.
- Long-beans have a slightly different texture to the other beans and really don’t hold up well to a long boil – they’ll get mushy and unpleasant.
So… what do I buy?
In my opinion, buy the best quality beans available for the way you want to cook them (groundbreaking hot take alert!).
But in all honesty – if you are buying just for fun with no recipe in mind, just find whatever is the prettiest and freshest, and cook it the way that best showcases its unique features.
If you’re buying for a recipe, go ahead and buy the amount specified. If you’re buying it as a side dish, I find that roughly one handful per (adult) eater is enough.
Storing green beans
Once picked, green beans should be stored in the refrigerator. In optimal conditions, green beans can last for 7 to 10 days, although I’d recommend using them in 5.
So, what are optimal conditions? I suggest keeping them unwashed, stored in an open container with a paper towel to absorb excess moisture. Why is this the best method? Well, your biggest enemy is moisture. When water sits on green beans (through condensation, high humidity, etc) the bean goes bad, eventually getting mushy and potentially moldy. Even worse – if one goes bad, soon the whole batch will too.
General nutrition
Green beans find their home in a wide variety of cuisines, come in cool colors, are tasty and generally easy to find, but where do they stack up nutritionally?
Green beans are a low calorie density food, generally with only about 30 calories per 100 grams. They have a pretty nice array of micronutrients, notably Vitamins A, C, and K.
While dried beans are a notoriously good plant-based source of protein, don’t really expect the same from green beans. Remember that green beans are immature beans – the plants have not had time to fully develop the proteins or fiber in the seeds.
Honestly, you won’t find green beans in the top 10 list for any vitamin, protein, or fiber content. But not every food has to be a super food.
How to cook green beans
So, how do you cook green beans? Let’s start with something you’ll need to do regardless of method…
Prepping a green bean
As we saw earlier, green beans have two ends – the string (where it attaches to the plant) and the tail.
The string contains the former flower that had to be fertilized for the bean to grow, and it is much tougher than the rest of the bean. No matter how you plan to cook the bean, that will have to go.
The tail of the green bean can stay, but many people choose to cut it off for symmetry.
Here’s my general rule for green beans: if I’m keeping them whole, I’ll just trim the string and leave the tail intact. If I’m cutting them into bite-size pieces, the tail’s gonna go too. But that’s just me.
No cooking at all
Let’s start by saying that you can technically eat green beans uncooked. Kind of like snap peas. I don’t think it’s the best way to have them, but it is an option.
That being said, green beans have a high level of lectins (like many legumes). In their raw form, lectins can interfere with digestion and cause an upset stomach. However, once cooked the lectins’ negative impacts essentially go away.
So if you want the “raw crunch” of a green bean in a salad or dish, it might be a safer bet to blanch them.
Simple – roast or pan sear
Besides eating them raw and not cooking at all, I find that pan searing and roasting are the easiest ways to cook a green bean.
The ideal texture in both cases is the same. Try to keep some of the crunch intact – if you want your green beans totally mushy, you might as well be using canned/frozen ones and saving yourself some work.
For roasting, try tossing them in oil and seasonings (I like to keep it simple – avocado oil with salt and pepper to taste) and laying them on a baking pan. Most importantly: GIVE THEM SPACE. E.g., the beans shouldn’t be touching one another on the pan. If you want crisp veggies, they need space to breathe. An over-crowded pan gives the water leaving the veggies nowhere to go and the veggies will just end up steaming.
One your pan is set, place them in a HOT oven. Like 425º F. The goal here is to get the outside of the beans charred (aka, develop some flavor) while still maintaining a “bite”. Again, the goal is no mushy green beans.
I like this method because it’s easy to do in the background.
Another slightly more hands-on (but still very simple) method is sauteeing.
Get some sort of fat warm in a pan – for example, I recently used a cast iron that had JUST been used to cook steaks, so there was a lot of lamb fat left over in the pan itself.
Toss in the green beans, season with salt and pepper (and anything else you like – I also added some thin-sliced onions) and cook for a bit over medium-low heat, allowing the outsides to develop color.
Once there’s some nice browning, go ahead and toss some sort of liquid in that pan. Wine, broth, lemon juice… I literally just used water. And plop a lid on. Now you’re steaming the seared beans, ensuring you have both a tasty sear on the outside, plus your desired level of tenderness.
Let it go until the beans hit your preferred level of tender and you have a perfect side dish.
And if you used the same pan as your protein, the flavors will complement each other perfectly.
Moderate – blanched
A slightly more complex option (that certainly involves more dishes) is blanching.
Blanching is where you drop an ingredient into boiling water for a brief amount of time (usually 1-2 minutes tops) and then immediately move it to an ice bath. The ice bath makes the ingredient instantly stop cooking and cools it back down to fridge-temperature.
Blanching is a common practice when you want to cook something a tiny bit (whether for safety or practical reasons) but not risk overdoing it.
Examples of when to blanch include: boiling peaches and shocking them in an ice bath to remove their skin, blanching a foraged ingredient (like fiddleheads) to kill any bugs/bacteria from the forest, and blanching a leafy green (like bok choy) to wilt it slightly but not destroy the crisp.
As I noted before, blanching is one of the few ways that I recommend cooking purple beans. ANY cooking of a purple bean will make the color go away. But quick blanching (I’m talk a minute or so) will break down the lectins that can upset your stomach and still keep them slightly purple, albeit more of a lavender color.
What do you do with blanched green beans?
They go well in salads – they still are crispy enough to add to the overall crunch without tasting too “green” (if that makes sense). I love adding them to Caprese salads, which can be a bit heavy sometimes. Plus, the additional vegetables help make the salad more filling. A good rule of thumb is “things that grow together will cook well together”. Since basil and tomatoes are classic summertime ingredients, the green beans play very nicely with them.

Advanced – preserving

The final method I’ll discuss in detail is preserving green beans.
Green beans are in their peak during the summer. On average I am able to pick about a pint every few days from our little raised bed. That sounds great until you’re having green beans with every meal – no matter how tasty a vegetable is, you’re gonna get sick of it eventually. That’s where preserving comes in. When you pickle or ferment a fresh vegetable you are preserving it for another season (where you are hopefully less tired of them).
Pickling comes in varying levels of complexity, which mainly has to do with how long you want the pickles to last. If you’re okay with pickles only lasting a few weeks you can make a fridge-pickle. If you want them to last longer (or have LOTS of veggies to pickle and need some to be saved for later) you can do a full canning-process. Regardless of the finally saving method, you’ll start the same way.
Prepping green beans for pickling
Regardless of where the pickles will end up (fridge or pantry) you’ll need to prepare the beans and brine.
Some recipes call for cooking the green beans before pickling them, but I find this unnecessary.
When I pickle green beans I like to keep them whole (except for the string, like I mentioned up top) – I find the curly tail cute in the final product. Trim your beans so they all fit in the jar of your choosing, with about an inch of “head room” at the top. This is important – your pickles need to stay totally submerged in the brine to stave off mold growth. And if you do end up canning them, you’ll need the extra air at the top of the jar to create a seal. We’ll talk about that later.
Add whatever aromatics you want to the jar. Things like fresh herbs, peppercorns, and garlic are common and popular. Once your jar is packed, you can pour your boiling brine on top until everything is submerged but there is still space at the top of the jar.
There are many recipes out there for pickled green beans – I use this one, but (as some people recommend in the comments) substitute a sweeter vinegar for the plain white.
As an interesting aside – the above recipe says not to put garlic cloves into a pickle. You totally can. But they’ll turn blue. This is due to a chemical reaction that occurs in the sulfur-rich garlic when exposed to a high-acid solution like pickling liquid. Here is a great article that goes more into depth on why this happens (and why they’re still safe to eat).
Fridge vs. pantry – how to store pickles
Pickles need a MINIMUM of a week for the vegetables to absorb the vinegary flavor of the brine and break down enough to taste crunchy but not “raw”. However, they can last for years if preserved right.
If you a plan to make a small batch that you’ll eat relatively quickly (think 5-6 weeks), you can make fridge pickles. Fridge pickles are SO easy. Just follow the steps above, and once the liquid is in the jars let them come to room temperature before transferring the jar to the fridge. Now you’re done. Let it sit a week and then enjoy.
I find fridge pickles to be a great option when you’re trying out a new recipe / vegetable to pickle. It’s relatively low stakes and doesn’t involve all the additional tools needed for canning.
However, if you know you like pickles, have a BUNCH of vegetables to preserve, and the time / patience, you can great canned pickles.
Canning is a food preservation process where you boil a jar of food. The boiling creates a pressure differential between the inside and the outside of the air. Air is forced out, which creates a vacuum seal between the lid of the jar and the jar itself. That seal means nothing is getting in (or out) of the jar. And the contents of the jar are (mostly) safe from contamination.
Canning is a bit of a fiddly process – if you do it wrong, the contents will all go bad. Or the jar might shatter mid-boil (that has definitely happened to me before). And not everything can be canned – there needs to be a certain level of acid and/or sugar in the food for it to even be shelf-stable to begin with. I would recommend reading up on canning if you’ve never done it before and want to get started – until I write up my own, this blog is a good reference.
If you plan to can your pickled green beans, you will need to have a deep pot of boiling water ready as soon as you pour the brine in. You’ll transfer the jars to a basket (the jars can’t touch the bottom of the pot – the direct heat exposure will crack them) and boil 10-15 minutes. Then remove the jars and let them rest at room temperature overnight. If the process worked you’ll hear a satisfying “click” from the jar sealing and the lid won’t flex when you lightly press it – it’ll be sealed shut.
Using pickled green beans
So what do you do with pickled green beans?
Whatever you want.
I like to eat them as a snack, just like any other pickle. They are a fun addition to a charcuterie board, or a cool topping to a cocktail (looking at you, Bloody Mary).
I’ve never done this, but I hear breading and frying them is AMAZING. I’ll update this blog with the results if I ever do.
Closing remarks
Alright, that was probably 3,000 more words than you ever expected to read about green beans. But if you made it this far, I hope you learned something!
I love fresh green beans. They are the epitome of a strong, summer staple and I hope this has inspired you to give this (often overlooked) ingredient another glance.
Do you like educational food content, but prefer a video format? Check out the video form of this blog on our socials…
